
Myles' '79 242 __ Honey Dijon __ dRoPp It LIkKe iT's HaWwT; Den är het!
Posted by Mylesofsmyles


|
Less text and moar pic, right!
Well, I've been thrown several surprises this week, some good and a lot of bad. After completing a road trip in the 242 from San Francisco to Santa Barbara and back, the 242 made it clear, what it needs, most expressly, to be a dependable and efficient car again. The wiring harness has far too many shorts and poor connections throughout it, so it'll need to be tossed and replaced with a fresher unit. Still struggling to find the source of my loss of RPM signal. I got a start on the transmission swap and got myself a T5 in the form of a '87 Mustang 2.3L. Can't argue with the price, so I took the whole car instead. Got my T5, and some cool extras to make the swap complete. Sensors, looks like a reverse light trigger, maybe a neutral safety trigger and looks like a electronic speedo signal off the mechanical cable...should be cool for a VSS for a EMS. Got the shifter and Driveshaft too...though I don't know how to remove that weight off the slip yolk...anybody know? :ninja: 
The transmission is soon to trade itself for a rebuilt 5.0L model, while more critical swap components arrive. 


|
|

|


Work Continues...

Got the donor Fox Body Mustang out of the garage, and sent it on it's way to make beer cans... With the extra space, I got the 242 back up on the jack stands, pulled the battery and drained the fluids. One thing led to another, and by the end of the evening, I had the IC, Radiator, Exhaust manifold w/ Turbo and complete engine harness and associated pieces extracted. Tonight...I got all but one transmission bolt off...got to bring home a 18mm box wrench home from the shop tomorrow, for the upper, intake side bolt. Driveshaft is removed and the cleansing process begins. Stay tuned. 
:godlike: Wideband came today, and she fits beautifully in my new 3-gauge pod. The silver trim around the WB gauge is a bit much; let's see how long I'll deal. 
What's really cool though, 
The WB gauge harness, was perfect length to run inline with the 240 chassis harness... 
Gotta run my grounds, switched power, ECU output and wire in the light bulb... 
|

:hahano: More work to be done, but though't I'd get rid of some dead weight....like a battery tray in the engine bay. Grabbed a 3/4" thread tap for the oil drain, but my factory bore is a lot larger...hmmm... Step One... Preheat oven to 500 degrees Fahrenheit 
While that's warming up, you can prepare all your ingredients... I this case, I made a crust from scratch, using whole wheat flour and flax seed...had to rise a little yeast with some warm water and honey first. That handled the dough, and I topped it with a nice assortment of garlic, red onion, zucchini, chicken sausage, tofu, basil & rosemary, mushrooms, green bell pepper and a serrano pepper and topped that with grated cheddar cheese. 
Throw that baby in the oven for 15 minutes. In the mean time, get to work... Got the rest of the battery box out...just a little scarring that I'll have to fill; first time with a metal grinder on sheet metal! 
I hate it when my car's suspension lacks adjustability, so got to work on what's been long overdue... 
Thanks Scotty! 
In all this, I still had to make time to please the boss... 
DING! Pizza's done... Pull that biatch out, let her sit for a minute and slice her up... Grab a slice and a fresh Tecate and write this post! 
Lil more progress... Got the driver side shock tower all squared away, just took some more time with a half-round rasp and a cool lil' grinding bit for my drill... 
I have full adjustment on the camber plate, in all directions...the only limit, is the diameter of the plate itself, but I'd never need it to turn that far in on the body's slots... 
Made a template with a good old piece of cardboard and a sharpie...flipped it upside down, and I had a passenger side template...so got to work... 
Was lazy about dinner tonight, and heated up some local andouille sausage...it was good, but not culinary or home made. ... .... Almost neglected to mention, I got a package in the mail today. Thanks Josh!!! 
|
I'm back in school, as of today!
Two night classes, each, once a week...so, once again, my car project time is divided. It's good to take breaks though. It's been a interesting riddle, learning how to tap for a oil return fitting. Sourced a 3/4x14 NPT tap, at a local hardware store, but couldn't source the 59/64" drill bit anywhere...found a place that sold a nice Irwin bit for $20, shipped. Got it, to learn it required a 1/2" drill chuck, which was larger than my corded decking drill. Brought the cordless 18v drill with 1/2" chuck and clutch home tonight, from the shop. 10 minutes, drilling carefully, straight and slow...I bored the hole!!! Went to class; just got home, and had the pleasure of tapping some beautiful 3/4" NPT threads...despite not having a proper t-handle for the tap, it's such a nice experience, tapping threads. I substituted the T-handle for a vice grip! 
Just look at those threads!!! 
I've now got some clearance concerns, for the oil feed at the alternator tensioner bracket. 
Spent some time, last night, before bed...cleaning up the passenger strut tower. I've still got to take some more material out at the front...cut on the conservative side and am working my way to the mark with a half round file and a cool little metal bit for my drill. 
Once I'm done with the metal work, the underside of the car and engine bay are due for some cosmetic treatment. Starting with a kerosene bath, to eliminate the road grime and oil, I'm going to finish it all in paint-on truck bed liner. Came up on two gallons, two complete kits, of black Herculiner. It'll be durable, rust prohibitive, and stay clean really well...or at least hide dirt, really well! 
A special feeling, for sure, takes over, when you cut metal... Tapping threads was awesome!!! Cutting sheet metal is simpler, but almost as therapeutic. A little bit at a time; it's more important to get it done right than fast... Cut out some dead weight and dialed in the passenger side for some camber... 
Eliminated some excess material for a fatter tank, in front of the condenser... 
Passenger side strut tower, complete... 
A little sumptin' sumptin' came in the mail today...thanks Roger, it looks amazing!!! Got a restoration on my R-Sport cluster from Roger, with a fresh circuit board and a few overhauled gauges! 
I've only got one switch missing... 
It's only the first coat... 
Since I had finished cutting all the metal I chose to, I pushed forward... Disassembled the steering linkage, so I could remove the subframe and firewall panels. With the engine bay gutted, I moved on to further cleaning, then Bondo filler for all the unnecessary holes and to fill the three 7/8" diameter holes I made to fit the Kjet turbo airbox. I let the bondo cure overnight, before sanding down the spots. It's my first time working with Bondo...it hardballs very fast; I used the Bondo fiberglass stuff. Just gave the engine bay it's first coat of black Herculiner. I wanted a functional, durable finish in the engine bay. Color keying the engine bay isn't my style. I think it'll be a nice offset and draw more focus to the actual engine, instead of the room around it. Got to let the Herculiner cure for several hours, so I'll recoat it tomorrow after work. |
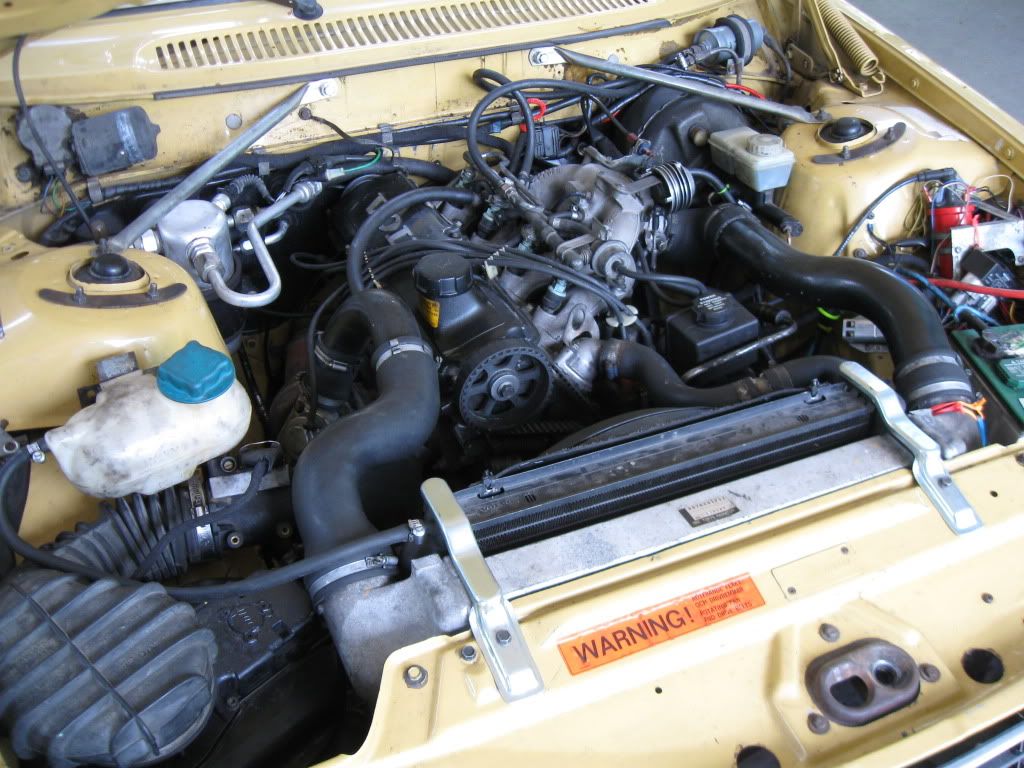
Engine Bay, complete!!!


The best thing about my textured, semi flat engine bay, is just how good it makes polished components look.... I just can't get enough of the IC and cambahh plates.... 
Damn! I LOVE my engine stand!!!!! Makes working on an engine so easy. I can't believe I've done as much engine work as I have without one. Got that silly 8V head off last night...it's up for grabs in FS. Getting ready for some Fly-Cuttin! These pistons look better than the last set I exposed. :lol: 
|
Daddy Got some moar Bling Bling!
:-D 
That's a billet steel round tooth crank gear, and a auxiliary shaft gear, both in 16-valve width, along with the 16-valve timing belt tensioner and Gates Kevlar belt. 
Pushrod to OHV adapters, as they were left on the table after Josh's Group Buy...I figure I'll sit on them till I find a 122 Sedan. 
The Tool...YoshiFab Special Tool #1; pending the arrival of the cutters... 
Oh, and an early Volvo, dunno which model, Rear Fog Light. Going to drill a hole in my Commando, and wire the lead from my new '92 Sedan harness to it. |
|


john vanlandingham John Vanlandingham Senior Moderator Location: Ford Asylum, Sleezattle, WA Join Date: 12/20/2005 Age: Fossilized Posts: 14,152 Rally Car: Saab 96 V4 |
Hi Myles from SanFrancisco, wise guy....(play nice, fix your fucking signature)(thank you) (smooooooooooochies)
Hey make all this stuff rally related by telling us about your ride with Alpert Kunkanenen. John Vanlandingham Sleezattle, WA, USA Vive le Prole-le-ralliat www.rallyrace.net/jvab CALL +1 206 431-9696 Remember! Pacific Standard Time is 3 hours behind Eastern Standard Time. |
alkun Albert Kun Mega Moderator Location: SF Ca. Join Date: 01/07/2008 Age: Possibly Wise Posts: 1,732 Rally Car: volvo 242 |
|
Fix my sig...wassup wit it? Didn't know I had one! I'm no wise guy, i'm a stooge, lolzzzzzzzz...ur supposed to be the wise ass, err guy! Relation to rally....well, Al's got a prretty inspirational dirg going Volvo 242....it's got all this SooperBitchin stuff and makes sounds like an angry boat! I don't play in teh dirt soo much...but starting to think about it...I'm a Tarmac Tramp!
Al Kun...can't really handle those TurboDicks anymore....That's just time and energy lost that could be redirected, actually working on the ride or smoothing the ladies! My budding "rally" car... LUV is in the air.... 
Made my way to Ken's today, for some assistance and supervision while I bled the brakes on the truck. 30+ year old brake fluid sure is funky... Check out the one cleaned reservoir vs the one yet to be addressed... 
Brakes hardly feel any better...I guess 4-wheel drums really do SUCK! But at least, I've got some confidence in air-free lines, clean and fresh fluid, and watching all the rust and particulate escape from the bleed screws. When the time's right, I'll swap the front hubs for the later style with disc brakes, make some stainless lines and use the Trooper vented rotors. In the mean time, check out my engine bay progress... 
Cleaned up a lot of the wiring, though it's not wrapped, and fitted that gucci new carb...and eliminated more SMUG components. A long way from this... 
Spent some more time, actually last night, on the Rallie Lighting! The Benz W123 Amber fogs are wired in...to the high beam field...so when I'm on low beam, the clear H4 and misc dual filament sealed beam are illuminated, then when you switch to high, they go high and the ambers come on for the low. I've got to add a relay or two though, as the stock LUV has no headlight relay. Installed the clean, uncracked parking light lenses and wired the Hella 500 driving lights to it's own switch, instead of driving off the headlights trigger. 
Cut me off, and I'll blind you from behind! 
The riddler at work...identifying the thread pitch for the cheapo Kragen rear axle u-bolts. I've been having some sheer strength issues with the hardware provided in that lowering kit...so I ditched the kit, though I've got no other u-bolts at this current time. I've had a few u-bolts fail, with the threads sheering right off. 
1/2" x 20, means a Volvo 240 lug nut will be perfect to double nut the existing hardware...after we shorten the bolts, smooth with a belt sander and chase the threads with the die. 
Back in bizz... 
|
I doez like some good head tho...
Got this 16v head but it's leakin a little at the valves....tried that rubbing compound n a lapping thule...but that didn't fix it. What next..... Don't know if I'm prepared to spend bux at the machine shoppe...especially cuz I still gotta pay JVAB for a clutch and pressure plate...after my flywheel is balanced. Hmmmmmmmmmmmmmmmm..... |
phlat65 Sean Medcroft Professional Moderator Location: Edmonds, Washington Join Date: 02/12/2009 Age: Possibly Wise Posts: 1,802 Rally Car: Building a Merkur |
|
Sorry, only registered users may post in this forum.
Rally Anarchy © 2014 Corvus Digital –
Part of the AutoShrine Network –
Problems? Send an email to the Webmaster