
Audi CQ Rally Build
Posted by dalspaugh


aj_johnson A.J. Johnson Super Moderator Location: Pendleton OR Join Date: 01/07/2011 Age: Settling Down Posts: 1,381 Rally Car: 88 Audi 80 |
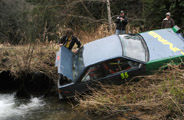
Well, after my ever so slight off at mt hood, I've found that my drivers front wheel will not center in the wheel well. Replaced the mangled ball joint tonight to find it still way out of wack. Further inspection revealed separation of the pinch joint and wimpy spot welds of the fender well to the unibody just in front of the back subframe bolt. The only reason I looked here is because mr Todd Lengacher said he'd had trouble in this area on one of the rallx cars.
I'll put it on a hoist tomorrow and try to snap some pics, but lets start planning for some reinforcement of your car right now! this wasn't an area that I'd even looked at when I did some minimal stitching. There is a chance the subframe is tweaked as well will have to swap it out and see what things look like. |
dalspaugh David Alspaugh Professional Moderator Location: Boston, MA Join Date: 04/30/2015 Age: Settling Down Posts: 66 Rally Car: '91 Audi Coupe Quattro |
F****** f*** ... I am never going to finish this car...

Fine. Consider this topic open for discussion. Let's talk through some of the hoops I'm gonna have to jump through here... Option A - Do it the right way Prep
Using my cute 110V Lincoln MIGer, weld something like 400 stitch welds, run my little baby tank out of gas like 8 times and prolly toast this cute li'l welder. Finish Keep the areas clean until the spring where it would actually be warm enough to paint them... Option B - "Do what I can - easily" I'm thinking this gets me away from having to deal with all the crud under neath the car... Basically do anything in the engine bay since there's currently no engine in there... Do some of the floor pan / Door sill areas from the top that are currently very easy to get to. This is craziness... Isn't one of those rally sayings something like: "get on stage as quickly as possible"? this seams (pun intended) to be going in the opposite direction of that... Real questions about this whole thing: Does this list actually capture anything remotely close to what this job entails? How many small children am I going to want to kill doing this job? How many small children am I going to want to save after first few rallies? My garage only has 110, is this a real problem? I don't have funds for a "real" welder, is this a problem? I'm an amateur welder at best, is this a problem? Liquid Nitrogen, is it fun? Am I going to lose my mind building this car? Answer: Yes Blog about my history with the rally car written for non-automotive folk: davescq.wordpress.com |
dalspaugh David Alspaugh Professional Moderator Location: Boston, MA Join Date: 04/30/2015 Age: Settling Down Posts: 66 Rally Car: '91 Audi Coupe Quattro |
Also, I'm just going to put this Exploded Parts diagram page here for reference
http://audi.7zap.com/en/usa/audi+coupe+quattro/couq/1991-141/8/ Blog about my history with the rally car written for non-automotive folk: davescq.wordpress.com |
aj_johnson A.J. Johnson Super Moderator Location: Pendleton OR Join Date: 01/07/2011 Age: Settling Down Posts: 1,381 Rally Car: 88 Audi 80 |
|
vbares Vittorio Bares Super Moderator Location: Londonderry, NH Join Date: 04/10/2007 Age: Ancient Posts: 413 Rally Car: Audi 4k (3b conversion) |
This is a point of reference - it is only 1 point - so major decisions should not be made solely on that 1 point. Important is to understand the difference between the b2 and b3 builds - which I do not.
My 4k has 43 documented rallies on it - some dnf's, mostly mechanical, but certainly I can see that there were a couple of significant repairs made to the shell prior to my acquiring it. It is not seam welded. |
dalspaugh David Alspaugh Professional Moderator Location: Boston, MA Join Date: 04/30/2015 Age: Settling Down Posts: 66 Rally Car: '91 Audi Coupe Quattro |
My understanding is that the B3 is better chassis than the B2. Even when this car was fully loaded, I've never been able to get to sit perfectly on 4 jack stands. this is obviously the fault of my garage but it should say something to the stiffness of the chassis. But regardless, AJ's chassis is quite similar to the one I'm using, should be the same everything forward of the floor pan... If I go option B... I guess I could use Dry Ice to conquer the body adhesive crap? that stuff looks mighty durable and it was slowing down my fancy ass dewault grinder whenever I touched it while taking out the vibration dampening material Blog about my history with the rally car written for non-automotive folk: davescq.wordpress.com |
john vanlandingham John Vanlandingham Ultra Moderator Location: Ford Asylum, Sleezattle, WA Join Date: 12/20/2005 Age: Fossilized Posts: 14,152 Rally Car: Saab 96 V4 |
Death ray
Miller 110v with 030 wire will not sweat too much if the power supply is good ie not 16g wires in the wall and at the end of the 100ft extention cord with 18g wires. Good juice to welder and 030 and everything will go fine Death ray cause those Howdis use the same rubberoid undercoating crap like the Xratyties do and that stuff is a major pain.. Dry ice, no its lame--liquid contacts the surface, piles of ice may NOT contact may be 2-5 mm off the surface so it has air insulation.. Liquid N is so cool its KEWL. And quick.... Time is money. You could do LOCAL welds on stressed areas.. John Vanlandingham Sleezattle, WA, USA Vive le Prole-le-ralliat www.rallyrace.net/jvab CALL +1 206 431-9696 Remember! Pacific Standard Time is 3 hours behind Eastern Standard Time. |
aj_johnson A.J. Johnson Super Moderator Location: Pendleton OR Join Date: 01/07/2011 Age: Settling Down Posts: 1,381 Rally Car: 88 Audi 80 |
got it on a hoist, looks like the majority of separation came from a direct hit. A arm was twisted, as was ball joint, subframe still appears square.
The separation of the seam between the frame rail and fender liner will get some add'l welding on both sides of the car other than that I'm repairing as needed. I may have been a little peeved when posting earlier. If you decide not to stitch I would keep an eye on this particular seam. Todd was telling me one of the rallyx cars has managed to wrinkle that pretty good. |
dalspaugh David Alspaugh Professional Moderator Location: Boston, MA Join Date: 04/30/2015 Age: Settling Down Posts: 66 Rally Car: '91 Audi Coupe Quattro |
Alright, getting back at this thing. Holidays and a old german DD have robbed me of my last few months! Want to get ya'lls opinion on some proposed welding I'm doing. I'm definitely looking at option B here.
Focused on the front end right now because it means I don't have to deal with liquid N and its the part of the car gets the most stress and it may soon be holding up the engine going back in the car (what a crazy thought) red lines are weld lines, blue are joints that I'm planning to leave 


 Blog about my history with the rally car written for non-automotive folk: davescq.wordpress.com |
john vanlandingham John Vanlandingham Ultra Moderator Location: Ford Asylum, Sleezattle, WA Join Date: 12/20/2005 Age: Fossilized Posts: 14,152 Rally Car: Saab 96 V4 |
John Vanlandingham Sleezattle, WA, USA Vive le Prole-le-ralliat www.rallyrace.net/jvab CALL +1 206 431-9696 Remember! Pacific Standard Time is 3 hours behind Eastern Standard Time. |
alkun Albert Kun Super Moderator Location: SF Ca. Join Date: 01/07/2008 Age: Possibly Wise Posts: 1,732 Rally Car: volvo 242 |
|
aj_johnson A.J. Johnson Super Moderator Location: Pendleton OR Join Date: 01/07/2011 Age: Settling Down Posts: 1,381 Rally Car: 88 Audi 80 |
|
dalspaugh David Alspaugh Professional Moderator Location: Boston, MA Join Date: 04/30/2015 Age: Settling Down Posts: 66 Rally Car: '91 Audi Coupe Quattro |
not totally what I wanted to hear about the blue lines although I can't say I wasn't partially already thinking it...
In the continued spirit of not wanting to go through hell to remove the chassis adhesive over those blue lines... what about laying in 1/2" x 1/2" angle and then welding the two sides?? Blog about my history with the rally car written for non-automotive folk: davescq.wordpress.com |
john vanlandingham John Vanlandingham Ultra Moderator Location: Ford Asylum, Sleezattle, WA Join Date: 12/20/2005 Age: Fossilized Posts: 14,152 Rally Car: Saab 96 V4 |
16g would do fine for the L strip. I do that along the floor to sill junction--a wek and sometime sketchy area. John Vanlandingham Sleezattle, WA, USA Vive le Prole-le-ralliat www.rallyrace.net/jvab CALL +1 206 431-9696 Remember! Pacific Standard Time is 3 hours behind Eastern Standard Time. |
dalspaugh David Alspaugh Professional Moderator Location: Boston, MA Join Date: 04/30/2015 Age: Settling Down Posts: 66 Rally Car: '91 Audi Coupe Quattro |
Hmm... I'm not seeing any angle thinner than 1/8" thk. Would make for some poor welding... .125" angel to (probably) .060" chassis steel.... Are you talking about 16 gauge flat strip John? Blog about my history with the rally car written for non-automotive folk: davescq.wordpress.com |
Sorry, only registered users may post in this forum.
Rally Anarchy © 2014 Corvus Digital –
Part of the AutoShrine Network –
Problems? Send an email to the Webmaster