
Mazda MX3 for learning and Rally/Ice X seat time
Posted by tin

tin Valentin Brovko Elite Moderator Location: Cowgary, Alberta Join Date: 10/14/2016 Age: Settling Down Posts: 22 Rally Car: Mazda MX3 |
Managed to finish only one head this weekend... If I had a 4 it would of been done! The pictures arn't so good, I'll take more soon.
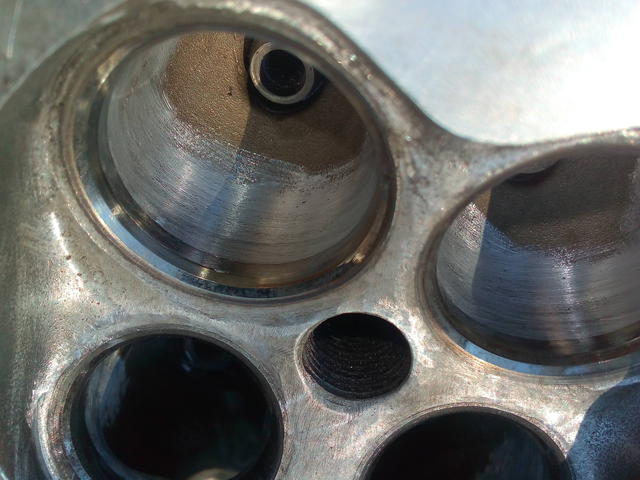
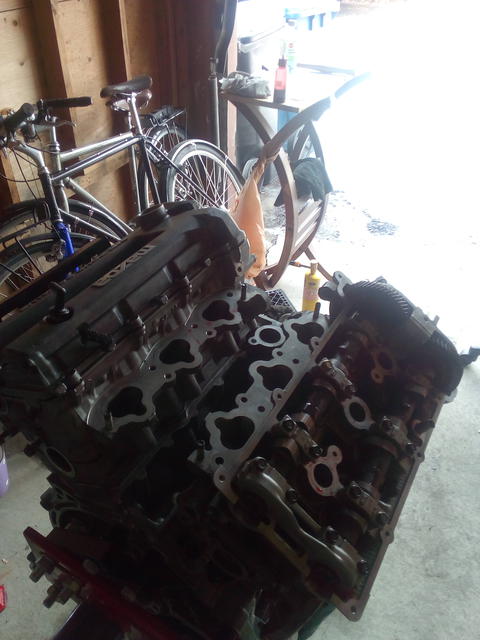
The ports look really good. I worked on smoothing the bowls to have exactly the same diameter, worked on the flow divider and converger thing veth ry minimally. They are just a little more streamlined without sacrificing strength. Less time to remove less material is a bonus! Also measured the combustion chamber volume of both stock and altered heads. Looks like I removed only 1-2CC and they are consistent with one another. Will do the second head and think, research, math out how much to skim them. Current compression ratio is 9.5:1, tuned to run on 89 Canadian Octane. Edited 1 time(s). Last edit at 10/31/2016 09:51PM by tin. |

tin Valentin Brovko Elite Moderator Location: Cowgary, Alberta Join Date: 10/14/2016 Age: Settling Down Posts: 22 Rally Car: Mazda MX3 |
Removed my old post by mistake....
Something to the effect of... Thanks Eric for those ratios. Will probably weld my diff before engine goes in. Does anyone have any insight for driving a FWD contraption with a welded diff? From some info I found on here and elsewhere the car should pull itself through corners on power, but understeer into corners unless tossed or turned inward, power oversteer as the inside wheel becomes unloaded, terrible for low speed maneuvers. Edited 1 time(s). Last edit at 10/31/2016 11:07PM by tin. |
tin Valentin Brovko Elite Moderator Location: Cowgary, Alberta Join Date: 10/14/2016 Age: Settling Down Posts: 22 Rally Car: Mazda MX3 |
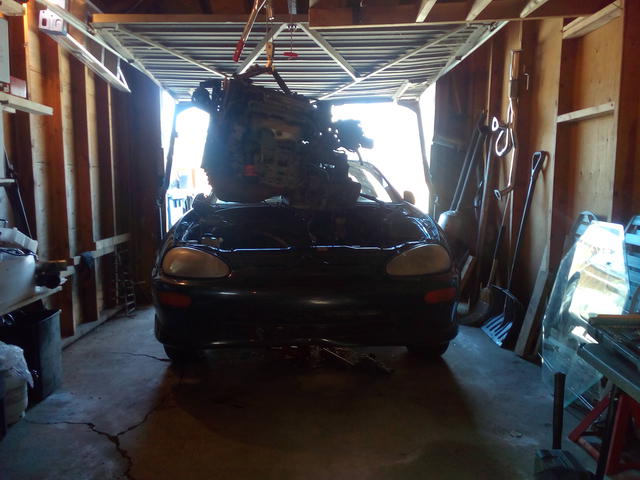
So I figured I'd update this think since there has been progress on the build. Not nearly as much as I'd hoped as life throws a wrench in the wheels sometimes so no driving has happened yet. My shed is also unheated and the winter here stoped me from getting much done in that cold. Currently the car is sitting without an engine and a freshly overhauled 2.5 litre unit with 10:1 compression, balanced pistons and rods and cleaned up heads is ready to go in. I pulled the old mill just last week.
But before that happens I need to clean up the engine bay, take care of any rust and service the brake master, steering rack and clutch (fluid flush). Then transfer some bits from the old engine to the new and make a skid plate. Either welding the diff or buying and installing a LSD is also on order. I'm leaning towards welding for now to feel out the car with less investment. But I've tracked down a factory mazdaspeed clutch diff, it's actually quite common for about $700 Kanadskis, with bearings and associated bits to make it work in the gearbox. The part number is GSY1-27-190. I haven't found much info on it other than that its a clutch pack. Does anyone have experience with Mazdaspeed LSDs or any advice on which way to go for now, weld or LSD. There is a guy I've spoken with who says the welded FWD handles very well on loose surface if thrown into corners and use the throttle to climb out. Is it worth while to do some stitch welding in the engine bay while its empty? Or is it better to leave all the chassis welding when the cage goes in? Maybe reenforce the strut towers? Also, I've never used exhaust heat wrap before. I need to shield the oil filter and sending unit as well as a PS line. Is the stuff garbage? Should I just not be lazy and make up some proper heat shields? |
tin Valentin Brovko Elite Moderator Location: Cowgary, Alberta Join Date: 10/14/2016 Age: Settling Down Posts: 22 Rally Car: Mazda MX3 |
Cleaned up and filled the tired and delaminated engine and trans mounts with some two part polyurethane stuff designed for industrial bushings. The hardness is 60 on the shore scale. I've used the stuff 3 years before for some torn trans mounts on my 4x4 that have since held up well to logging road and trail use. I remember reading somewhere that solid mounts will help save CVs, not sure on this, but it seems that less elasticity in the drivetrain is a good thing. Anyway it cost $0 since the stuff had been laying around for a couple years now.
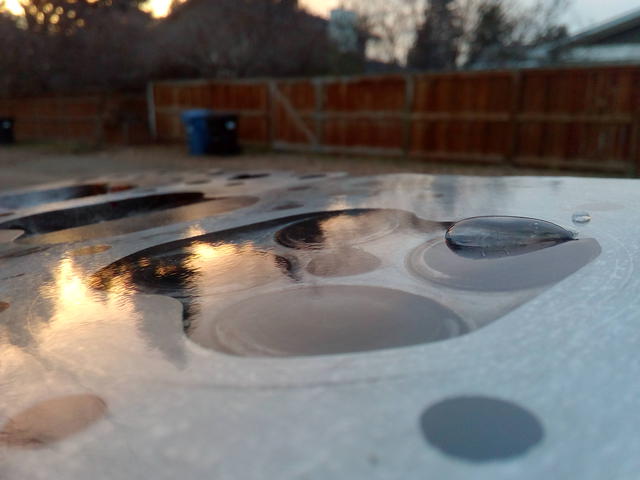
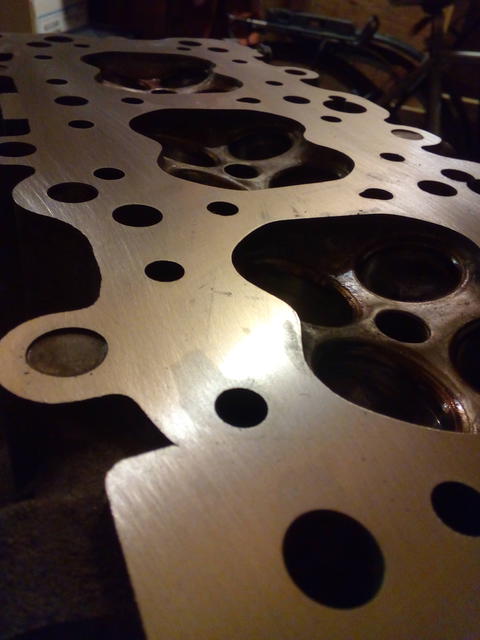
Also, thank you John for the lengthy and informative conversation last December; on engine rebuilds and a mass of other subjects rally related and not. You gave me a lot of insights to getting getting the engine together properly and with minimal investment. Not to mention an overwhelming: how can it be so nice to talk to a complete stranger for two hours you feel like you've been blabbing with an old friend. This being a true hobo budget build (I'm living on student loans mostly) I decided to take the .010in warp out of the cylinder heads by using an old school method I had heard about. Basically I scavenged a thick piece of glass, 9/16in or so, made sure it was true with the help of some borrowed fancy tooling from school. Then stuck some wet/dry sandpaper in grits ranging from 150 to 800 on it with contact adhesive so it was totally flush. Spray water on the paper and slide the head back and forth on the papers. I was able to get the decks of the heads within .002 true throughout and polished good enough to be able to use some MLS gaskets. Cost of head lapping totalled about $15 doll hairs, all for sand paper. The photo is of one of the heads in the process of using something like a 230 grit. Also yesterday I got the timing case built and the belts together. I can basically use any part from the 1.8L K8 on the 2.5L KL so mixing pulleys to get all bearings smooth saved some money as well. Next week the plan is to disassemble the gearbox and weld the diff. Also a la John's advice to have half shafts inserted for alignment while welding. I'm going to weld in some plate to join the gears. Also will service the PS unit and Alternator next week. Edited 1 time(s). Last edit at 04/08/2017 02:22PM by tin. |
Sorry, only registered users may post in this forum.
Rally Anarchy © 2014 Corvus Digital –
Part of the AutoShrine Network –
Problems? Send an email to the Webmaster